
BPI-216N/L Programmer's Reference
This page describes the font and instruction set. For hookup, configuration and specifications, please see the hardware reference.
Table of Contents
Serial Communication
BPI-216s accept asynchronous serial at 2400 or 9600bps, 8 data bits, no parity, 1 or more stop bit(s), often called "N81." They will accept RS-232 input or inverted TTL. See the hardware reference for further information.
The BPI serial interface is a specialized serial-to-parallel converter that writes the data it receives to the attached 2x16 LCD. To differentiate text from instructions (like clear-screen or move cursor), the BPI recognizes character code 254 (0xFE hex) as an instruction prefix. A single byte following this prefix will be conveyed to the LCD as an instruction rather than displayed. A useful subset of LCD instructions is described below.
Character Set
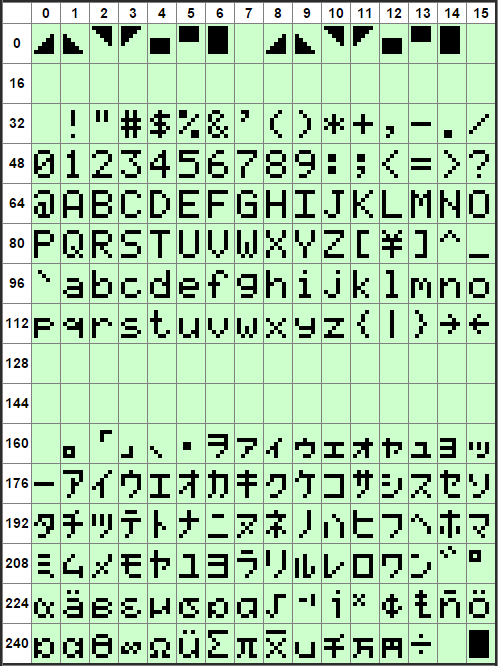
BPI-216s display the standard LCD character set for character codes 32 to 127 (0x20-0x7F hex). Character codes 0-7 (0x00-0x07 hex) are custom characters that can redefined by writing to character-generator RAM. Note that the custom characters are repeated at character codes 8-15 (0x08-0x0F), as shown in the chart.
Character Set (Character code= row+column)
Screen Layout
BPI-216 displays two lines of 16 characters on a standard alphanumeric LCD. Since the BPI uses the LCD's own internal instructions, it follows the LCD's addressing scheme, as shown in the drawing below. Each line of the display has 40 bytes of RAM; the first 16 bytes are the characters visible on the display, while the remaining 24 bytes are invisibly stored off screen.
When you send text to the BPI-216, characters print left to right across the screen. At the end of the first line, printing does not wrap to the second line. Instead, subsequent bytes go into offscreen RAM. After a total of 40 bytes, printing wraps to the second line.
For example, starting with the display cleared (its power-up state), suppose you send the following 80 bytes of text:
Alphanumeric LCDs have 80 bytes of RAM. The screen is a window into this memory.
..here is how the text is displayed and stored:

LCD Instructions below allow you to position the cursor (printing location) to stay within the visible screen, or scroll off-screen memory into view.
LCD Instructions
Text sent to the BPI-216 is written directly to the LCD; send Hello World! and Hello World! appears on the LCD. The LCD also understands a range of instructions. To differentiate instructions from text, the BPI interprets character code 254 (0xFE hex) as the instruction prefix. The byte that follows this prefix will processed as an instruction rather than displayed.
Here is a list of the most useful LCD instructions. In these descriptions, the term cursor means next-character printing position regardless of whether a visible cursor is turned on. Items marked with » can be clicked for tips or more detail.
Clear Screen 254 1 dec 0xFE 0x01 hex
Clears the screen and moves the cursor to the first character of the top line. »
Home Cursor 254 2 dec 0xFE 0x02 hex
Moves the cursor to the first character of the top line without clearing the screen. »
Set Cursor Position 254 128-231 dec 0xFE 0x80-0xE7 hex
Moves the cursor to an address in display memory. The drawing below shows the addresses of visible screen locations. For example, to move to position 4 of the second line, send 254 196 (0xFE 0xC4 hex). Note that the relationship between the screen and display addresses is changed by scrolling; see below.»

BPI-216 Screen Addresses
Move Cursor One Position Left 254 16 dec 0xFE 0x10 hex
Moves the cursor one space to the left of its current position. Does not erase or alter characters on the screen.
Move Cursor One Position Right 254 20 dec 0xFE 0x14 hex
Moves the cursor one space to the right of its current position. Does not erase or alter characters on the screen.
Turn on Visible Blinking Cursor 254 13 dec 0xFE 0x0D hex
Causes a blinking solid-block cursor to appear at the current printing location. As new characters are received, the cursor moves to mark the location where the next character will be printed. If the printing position is in off-screen memory, the cursor is not visible.»
Turn on Visible Underline Cursor 254 14 dec 0xFE 0x0E hex
Causes an underline cursor to appear below the current printing location. As new characters are received, the cursor moves to mark the location where the next character will be printed. If the printing position is in off-screen memory, the cursor is not visible.»
Turn off Visible Cursor 254 12 dec 0xFE 0x0C hex
Turns off visible cursor (if any).»
Blank the Display 254 8 dec 0xFE 0x08 hex
Turns off the screen without erasing display memory. Sending any of the previous cursor on/off instructions restores the display.»
Scroll One Position Left 254 24 dec 0xFE 0x18 hex
Moves the screen-window one position to the right, which cause the appearance of shifting both lines of text one position to the left. Both lines shift/scroll together; there's no instruction that scrolls one line independently.»
Scroll One Position Right 254 28 dec 0xFE 0x1C hex
Moves the screen-window one position to the left, which cause the appearance of shifting both lines of text one position to the right. Both lines shift/scroll together; there's no instruction that scrolls one line independently.»
Point to Custom Character RAM 254 64-127 dec 0xFE 0x40-0x7F hex
Directs subsequent bytes to custom-character memory, also known as character-generator (CG) RAM. Bytes written to CG RAM redefine the shapes of characters 0-7 in the LCD character set. See Custom Characters below for more information.
Advanced LCD Instructions
The BPI interface does not filter the instructions it receives; any byte received immediately after an instruction prefix (254 dec, 0xFE hex) is transferred to the LCD with the register-select (RS) bit cleared (="instruction"). After writing that byte, RS is set so that subsequent bytes are written as data/text.
If you're familiar with direct LCD interfacing, you're aware that there are additional instructions such as Function Set (32-63 dec, 0x20-0x3F hex) that are used to initialize the display. Do not send these instructions. They serve no purpose, since the BPI interface initializes the LCD at startup, and they can cause the LCD to lock up and refuse to accept additional input until turned off/on.
Another set of LCD instructions not covered here are the Entry Mode series (4-7 dec, 0x04-0x07 hex), which can configure the LCD to print backwards and or scroll instead of moving the cursor as new characters are written. The limited usefulness and high confusion factor of these instructions are the reason they're not documented here. If you're curious, check out documentation on the HD44780 or KS0066/U LCD controller chips.
Custom Characters
Most of the LCD characters cannot be changed because they are generated from bitmaps stored in the LCD's ROM. However, the lowest eight characters, corresponding to codes 0-7, can be changed by writing new bitmap data to character-generator RAM (CG RAM). As the character-set chart shows, the BPI initializes these characters with some wedge- and block-shaped patterns. But you can change them to any 5-by-8-pixel pattern you want.
Defining the Custom Character Pattern
The drawing below shows how the bits of eight bytes define the shape of the custom character. The upper three bits of the pattern bytes are ignored. A tool for calculating custom-character bytes is online at seetron.com.

Bitmap Layout for Custom Characters.
Those eight bytes must be written to the CG RAM address of the custom character you want to define. Addresses range from 64-127 (0x40-0x7E hex) with the individual characters at eight-byte intervals. So here are the addresses of the characters:
| Character | Address |
|---|---|
| 0 | 64 |
| 1 | 72 |
| 2 | 80 |
| 3 | 88 |
| 4 | 96 |
| 5 | 104 |
| 6 | 112 |
| 7 | 120 |
Downloading the Pattern
To define custom-character 3 to the °F pattern in the example above, you'd send the sequence of bytes shown below:
| CG Addr | B0 | B1 | B2 | B3 | B4 | B5 | B6 | B7 | Display Addr | |||
|---|---|---|---|---|---|---|---|---|---|---|---|---|
| Dec: | 254 | 88 | 8 | 20 | 8 | 7 | 4 | 6 | 4 | 4 | 254 | 128 |
| Hex: | 0xFE | 0x58 | 0x08 | 0x14 | 0x08 | 0x07 | 0x04 | 0x06 | 0x04 | 0x04 | 0xFE | 0x80 |
Note that the sequence ends with an instruction to move the cursor to a location in display RAM. If this step is omitted, subsequent data will not appear on the display; it will be written to further addresses in CG RAM.
If you need to redefine all eight custom characters, set the CG RAM address to 64 (the start of character 0) and write 64 bytes of pattern data.
Custom Character Quirks
Redefinition Changes Previously Printed Characters When you redefine the pattern of a character that is already displayed on the screen, the existing character changes to the new pattern. This is either a bug or a feature depending on what you were hoping to accomplish. If you wanted more than eight custom characters, it's a bug. If you wanted to create a simple animation (like the odometer effect in this app note), it's a feature.
Cursor Tracks CG RAM Location If a cursor is on while you are writing to the first two custom characters (addresses 64-79), that cursor will be visible on the second line of the display. Apparently a single address counter is shared between CG RAM and display RAM, and the cursor follows the counter.
Positioning Instructions If you are writing to CG RAM and send a Clear-screen or Home instruction, the LCD will exit CG RAM and go to the first position of the top line. Move Cursor Left/Right instructions reposition the address counter in CG RAM; they do not return to display RAM. The scroll instructions work normally during a CG RAM write, causing the display to visibly shift, but the LCD stays in CG RAM and the address counter is not affected.
Restart Clears CG RAM to Default Custom characters are stored in RAM, so they are lost when the power is cycled.