
BPP-420L Hardware Reference
This page describes the BPP-420's hardware, hookup, configuration and specifications. It also applies to the BPP-420VY and other variants with LCDs of different colors/modes. For information on sending data and instructions to the display please see the programmer's reference.
Table of Contents
Cautions and Warranty
Handling, Usage and Operating Precautions
- Do not exceed the maximum supply voltage of 5.3Vdc.
- Always ensure that supply polarity is correct.
- If the screen requires cleaning, use low-tack tape to remove dust.
- Do not wipe or scrub the screen; it is easily scratched.
- In a permanent installation, mount the display behind a transparent window.
- Protect the unit from electrostatic discharge (ESD).
- Do not subject the display to sharp impact or mechanical pressure.
- Do not disassemble, drill or modify the unit in any way.
- Do not allow solvents, cleaners, or water to come into contact with the screen.
- Do not operate when wet or under conditions of condensing humidity (dew).
Seetron warrants this product against defects in materials and workmanship for a period of 90 days. If you discover a defect, we will, at our option, repair, replace, or refund the purchase price. Return the product with a description of the problem. We will return your product or its replacement via standard shipping. Expedited shipping is available at the customer's expense. Note: Violating the usage guidelines above, or attempting to repair or modify the module or the serial interface, voids this warranty.
Connection/Configuration
Hooking up the BPP-420 requires three connections: 5Vdc (regulated), serial input (2400 or 9600 bps, N81) and ground (connected to both power and the computer/controller).
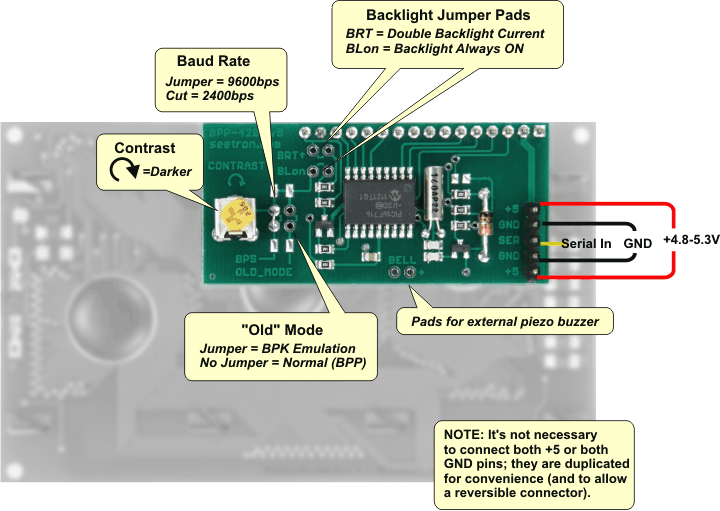
BPP-420 Serial Interface Board.
Configuration Jumpers
There are two configuration jumpers on the BPP-420 serial interface.
- BPS: Jumper=9600bps (default), No/Cut Jumper=2400bps
- "Old" Mode: No Jumper=Normal Operation (default), Jumper= Emulate pre-1996 BPP-420L
Do not install a jumper at Old Mode unless you specifically need to emulate an old (early 1990s) BPP-420. This mode disables the features described in the current programmer's manual.
Serial Input
BPP-420s accept inverted serial input, such as the output of an *RS-232 port. The direct output of a UART is noninverted; it is not compatible unless inverted (NOT gate). In some cases, workarounds exist to avoid the additional component:
- Basic Stamp SEROUT instructions accept a parameter that inverts the output in software.
- Arduino v1.0+ SoftwareSerial supports inverted output:
SoftwareSerial(rxPin, txPin, 1);(where 1 sets inverted output). - PIC microcontrollers with the "enhanced" USART (EUSART) can be configured for inverted output by setting the SCKP bit of the BAUDCON register during USART initialization.
*RS-232 serial signals often use ±10V signals. These voltages will not harm the BPP-420, which has a protective "clamp" circuit on its serial input.
Serial Input Voltage Threshold
The BPP-420 is directly compatible with both RS-232 and inverted logic-level serial hookups. This information is provided for the benefit of users who may be interfacing the display to low-voltage or nonstandard logic devices. Low-to-high transition (highlighted in the table) is the beginning of the serial start bit.
| Transition | Vthreshold |
|---|---|
| Low-High↑ | 2.4V |
| High-Low↓ | 1.4V |
Solder Pads
"Bell" Output. A piezo buzzer may be connected to the pads marked "BELL" on the interface board. The buzzer will beep when the ctrl-G Bell character is received. A compatible buzzer will have these specs:
- 5Vdc operation
- Internal oscillator (buzzer, not a speaker)
- Less than 25mA current draw
BL_ON Jumper. Shorting the pads marked "BL_ON" wires the backlight on (it is normally controlled by the ctrl-N and ctrl-O instructions).
Bright↑ Jumper. Shorting the pads marked "Bright↑" doubles the backlight current.
Dimensions (in mm)
Total depth (front of screen to highest point on pcb) is 26mm.
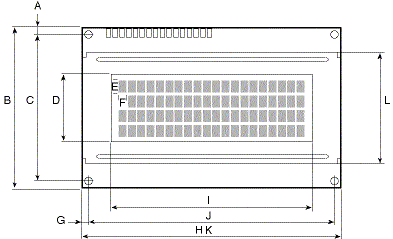
| A | y offset edge to hole center (top & bottom) | 2.50 |
|---|---|---|
| B | y pcb height | 60.00 |
| C | y hole spacing | 55.00 |
| D | y screen opening | 25.20 |
| E | y character height | 4.75 |
| F | x character width | 2.95 |
| G | x offset pcb edge to hole center | 2.50 |
| H | x screen frame | 98.00 |
| I | x screen opening | 76.00 |
| J | x hole spacing | 93.00 |
| K | x pcb width | 98.00 |
| L | y frame height | 42.00 |
| - | mounting hole diameter | 2.50 |
| - | screen frame depth | 8.50 |
Mounting
As mentioned in "Cautions" above, BPP-420 must be mounted behind a transparent window in any permanent installation. If it is not, the screen will be vulnerable to damage from users' fingers (e.g., electrostatic discharge or mechanical stress), moisture, dirt, mechanical damage, etc. Damage of this kind is not covered by warranty.
An inexpensive mounting kit is available for these devices (PN: BEZ-420), but any transparent barrier will suffice.
Specifications
| Power Requirements | 4.8 to 5.5Vdc at 10mA (100mA backlight on) |
|---|---|
| Serial Input (electrical) | RS-232 (±15V OK), inverted TTL |
| Serial Input (logic/data) | Inverted, 2400 or 9600bps |
| User Connector | 5-pin header, 0.025in. posts on 0.10in. centers |
| Connector Pinout | +5V Gnd Serial Gnd +5V |
| Operating Temp. | 0° to 50° C (32° to 122°F) |
| Display Type | STN Character LCD, 4 lines x 20 characters |
| Character Size | 5x7 pixels, 4.75mm (0.19in.) height |
| Overall Size (wxh) | 98x60mm (3.86x2.36in.) |
| Depth | 26mm (1.02in.) |