
SGX-120L Configuration Tools
DISCONTINUED: REFERENCE ONLY
The SGX-120L stores startup settings and bitmap images in its flash memory. You can configure the SGX either by using escape instructions or with the pair of Windows utilities available from seetron.com.
When development is complete, you can order SGX-120Ls pre-configured with your settings and bitmaps. Email tech@seetron.com for more information.
System Requirements
The SGX configuration tools run on any PC with Windows '95 through Windows 10. They require the use of an RS-232 serial port or USB adapter.
For editing SGX-compatible bitmap graphics, you will need Windows Paint (MSPAINT.EXE), the free graphics editor included with Windows under Accessories in the Program menu.
Downloading and Installing the Tools
Download the ZIP file containing both programs here. Unzip them to a convenient location (directory on your hard drive, flash drive, etc.). Total space required is less than 200kB. When you run the programs they will create small files to save your settings.
Vista and Higher Security Alert
The SGX tools make no changes to your system configuration, registry, etc. Under Vista and more recent versions, they will cause an "Unknown Publisher" alert; this is not an issue so long as you're certain that the files were downloaded from seetron.com. If in doubt, download a fresh copy from seetron.
Using the Configuration Tool
Before using the configuration tool, make sure the SGX-120L is in the setup mode:
- On the v1 model, the SET/RUN switch must be in the SET position.
- On the v1 model, the 2400/9600 switch must be in the 9600 position.
- On the newer v2 model, the Dsu (Display setup) jumper must be intact (not cut).
Connect the SGX to the PC serial (comm) port and power. Double-click sgxconfigtoolv1.exe for the following screen:
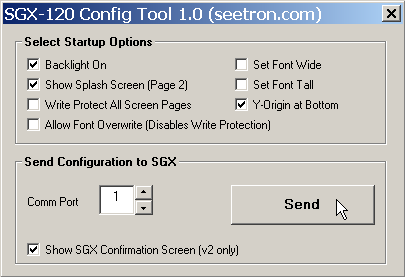
Pick the options you want, set the correct comm port number and click Send. Options take effect after the SGX power has been turned off and back on.
If the SGX is a newer v2 model (see version differences), checking Show SGX Confirmation Screen will cause the SGX to respond to a configuration download with one of two screens indicating success or failure:
 |
 |
Write Protection
If you plan to store bitmaps in SGX flash memory, make sure that write protection is off/unchecked. When you are finished storing bitmaps in SGX flash, turn write protection on.
The original v1 SGX had only a single write-protection setting, on or off. The newer v2 model adds default write protection for the font bitmaps, stored in screen pages 0 and 1. Here is how the two settings interact:
 |
Allows writes to pages 2-16; blocks writes to the default font screens (screens 0, 1). |
 |
Prevents writes to any page. |
 |
Allows writes to all pages (0-16) including font (screens 0, 1). |
Using the Bitmap Tool
Setting up the SGX
- On the v1 model, the 2400/9600 switch must be in the 9600 position.
- If you plan to store bitmaps in SGX flash, you may have to disable write protection (if it was previously turned on). See the Configuration Tool above.
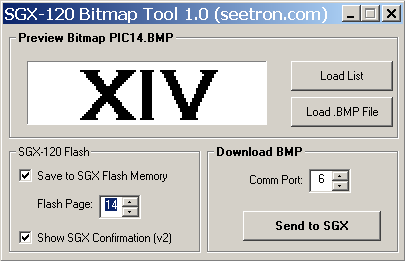
Connect the SGX to the PC serial (comm) port and power. Double-click sgxbitmaptoolv1.exe for a screen similar to this:
Downloading a Bitmap
Click Load .BMP File to pick a bitmap for downloading. Eligible files have the following properties:
- File extension .BMP
- Dimensions 120 by 32 pixels
- Monochrome (black&white)
- File size 574 bytes
The .BMP can then be sent to the SGX by setting the correct Comm Port number and clicking Send to SGX. If you want the SGX to store the picture in flash memory, pick the desired flash page number and check Save to SGX Flash Memory, then click Send..
Reminder: Flash pages 0 and 1 are the default font. If you overwrite them with something other than a font, the SGX will print gibberish.
Downloading a List of Bitmaps
As you store bitmaps to SGX flash, the software updates a file called sgxscreens.lst. This is a plain-text file that you can view with Notepad. It stores the filenames and screen-page numbers of bitmaps that you have stored to the SGX. Using this list, you can set up other SGXes with identical bitmaps and screen-page assignments.
To download a list of bitmaps, press Load List and find sgxscreens.lst. If you want to save this list for future use, right-click it and choose Rename. Give it an alternative name like defaultSGXscreens.lst. (Renaming the file prevents the software from overwriting it.) Open the file. The screen will look like this:
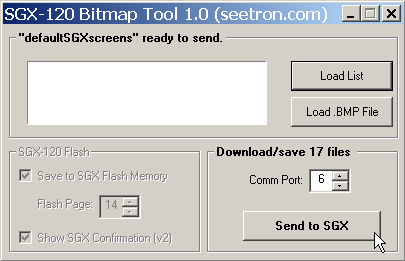
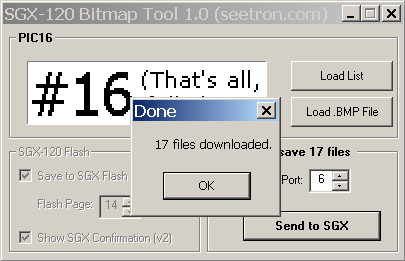
Now when you press Send.. all bitmaps on the list will be stored to the same SGX flash pages that you previously set manually. As each bitmap is downloaded, a preview will appear:

When the process is complete, a status box pops up:
To load another SGX, click Send to SGX again.
Confirmation Screens
The newer v2 SGX has the ability to display a confirmation screen after a bitmap file is downloaded and stored. This notifies you in the event that the save procedure was blocked by write protection. This feature is only available during manual downloads (check the Show SGX Confirmation box); during list downloads the images flash by too quickly for the confirmation screens to be useful.
 |
 |
Raw Bitmap Data
The bitmap tool can output raw bitmap data— to use, for example, in your own program that will download bitmaps to the SGX. Use the bitmap tool as described above, but set Comm Port to 99. The data will be copied to the clipboard as text (with the 480 bytes in hexadecimal format, "0x##" style). You can paste this data into your own program for formatting/labeling in accordance with the requirements of your assembler or compiler.