
SGX-120L Programmer's Reference
DISCONTINUED: REFERENCE ONLY
This page describes the SGX-120L's fonts and instruction set. For hookup, configuration and specifications, please see the hardware reference. These instructions apply to SGX-120L, version 2.0 and later. For a summary of differences from the earlier versions, see the upgrade guide.
The SGX-120L is a 120x32-pixel graphics LCD with a 9600bps serial interface. It can store a customizable font and 15 full-screen bitmap images in its flash memory. The SGX has four font sizes that can be mixed on the screen, and can draw lines and plot points. This page describes the control codes that format text and the escape codes that download, draw and store graphics.
Table of Contents
- Other Pages
- Index, Revision History
- Hardware Reference
- Product Description
- Version 2.0 Upgrade Guide
Serial Communication
SGX-120Ls accept asynchronous serial at 9600bps, 8 data bits, no parity, 1 or more stop bit(s), often called "N81." They will accept RS-232 input, inverted TTL, or non-inverted TTL. Non-inverted TTL requires cutting the SPol jumper on the circuit board. See the hardware reference for further information.
Character Set
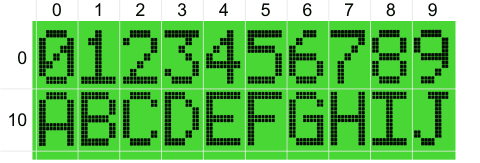
SGX-120Ls accept character codes 32 to 191, with the lower codes (< 128) corresponding to the standard ASCII character set. Characters can be added or changed by editing the .BMP graphics stored in pages 0 and 1 of the display's memory. (In the character set shown below, the higher codes, 128+, contain guidelines for designing your own characters). See here for more information on downloading bitmaps.
Any pair of stored bitmaps can be used as a font; the display controller selects a 6x8-pixel chunk of the selected bitmap according to the character code received and displays it on the screen in the current font size and position. See ESC-F in the Escape instructions below.
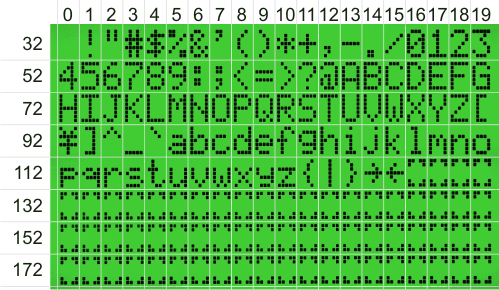
Default character Set (Character code= row+column).
Screen Layouts
SGX-120L offers multiple font sizes, which can be freely mixed on the screen. The following screen layouts show position values for the various font sizes. Positioning (ctrl-P below) works in terms of the font-size in effect at the time. In the illustrations below, position = row + column.
Default 4x20 Screen Layout
Wide-character, 4x10 Screen Layout
Tall-character, 2x20 Screen Layout
Large-character, 2x10 Screen Layout
Control Codes
SGX-120Ls understand a small set of control codes that format incoming text. Some are standard (carriage return, backspace, tab) and others are display-specific (position, right-align, backlight on/off). Codes not listed below (e.g., Null, 0) are ignored by the display.
Items marked with » can be clicked for tips or more detail.
Home (ctrl-A) 01 dec 0x01 hex
Moves the printing position to 0, the first character of the top line. »
Start Inverse-mode Printing (ctrl-B) 02 dec 0x02 hex
Switches text printing to light pixels on a dark background. »
End Inverse-mode Printing (ctrl-C) 03 dec 0x03 hex
Sets printing to normal, dark pixels on a light background. »
Backspace (ctrl-H) 08 dec 0x08 hex
Backs up one character, erases that character, sets the print position to erased character's location. »
Tab (ctrl-I) 09 dec 0x09 hex
Moves the printing position to the next multiple-of-4 screen location: 0→4→8→12→16→20→24→... »
Linefeed (ctrl-J) 10 dec 0x0A hex
Moves the printing position down a line. »
Vertical Tab (ctrl-K) 11 dec 0x0B hex
Moves the printing position up a line. »
Clear Screen (ctrl-L) 12 dec 0x0C hex
Clears the screen and moves the printing position to 0—the first position of the first line. »
Carriage Return (ctrl-M) 13 dec 0x0D hex
Moves to the first printing position of the next line. »
Turn On LED Backlight (ctrl-N) 14 dec 0x0E hex
Turns on the LED backlight. »
Turn Off LED Backlight (ctrl-O) 15 dec 0x0F hex
Turns off the LED backlight. »
Set Printing Position (ctrl-P) 16 dec 0x10 hex
Sets the printing position according to the value of the next byte, position+64 (0x40 hex). »
Right-align Text (ctrl-R) 18 dec 0x12 hex
Displays text (usually numeric) within a field 2 to 8 characters wide. The byte that follows ctrl-R is a text number from '2' to '8' (50-56 dec, 0x32-0x38 hex) that sets the field width. The text after that will be invisibly stored until one of the following is received:
- A control code.
- A period/decimal point.
- The specified number of bytes.
When this happens, the field will be cleared and the received text printed at the righthand end of the field. »
Escape: Start Multipart Instruction (ctrl-[) 27 dec 0x1B hex
See the Escape-code descriptions below.
Escape Instructions
These are multipart instructions that begin with the Escape character; 27 dec, 0x1B hex. Escape instructions work with graphics and/or memory: downloading/storing/recalling bitmaps, plotting points and lines, setting startup configuration.
Numbers Used in Escape Instructions: Many Escape instructions accept number(s) to specify coordinates, screen pages, etc. The standard way of specifying numbers is as a single byte set to 64+n, where n is the desired number. For example, the value 123 decimal (0x7B hex) is sent as a byte containing 123 + 64 = 187 decimal (0xBB hex). However, most numbers can also be sent as a text string such as "123." (i.e., four bytes set to the ASCII codes of the printable numbers and the period: 49 50 51 46 decimal (0x31 0x32 0x33 0x2E hex). This allows you to type instructions from a terminal program for demonstration purposes. It is not recommended for programming, as it uses multiple bytes when one would do. It is deprecated and may not be supported by future products.
Set Address for Byte-write ESC A x y
Specify the screen address to be used by Escape B. ESC A (uppercase A; 65 dec, 0x41 hex) x y where x is 0-119 (the width of the screen) and y is 0-3 (height of the screen/8 bits). Both x and y are sent as a byte set to 64+n, where n is the coordinate value.
Example: To set the byte-write address to 85,2 you would send the 4-byte sequence 27 65 149 66 decimal (0x1B 0x41 0x95 0x42 hex).
Write a Byte to the Screen ESC B byte
Write a single byte (0-255 decimal, 0x00-0xFF hex) to the screen as a vertical column of eight pixels (lsb at the top). ESC B (uppercase B; 66 dec, 0x42 hex) byte. The byte is written to the location previously specified by Escape A. After this instruction, the write-byte address is incremented by 1. If your program requires writing bytes to sequential screen locations (left to right and top to bottom) you need only to set the starting address.
Since ESC B requires the full range of byte values, 0-255 (0x00-0xFF hex), bytes must be sent as text numbers. The single-byte mechanism can't send numbers larger than 191 (0xBF hex).
Example: To write the byte 170 decimal (0xAA hex) to the screen location previously set by Escape A, you would send ESC B followed by the characters '1' '7' '0' '.' (just the letters inside the quotes, not the quotes themselves). That would be a 6-byte sequence: 27 66 49 55 48 46 decimal (0x1B 0x42 0x31 0x37 0x30 0x2E hex). »
Download Graphic ESC D G B0...B479
Download a bitmap graphic to the screen. ESC D (uppercase D; 68 dec, 0x44 hex) G (uppercase G; 71 decimal, 0x47 hex) followed by 480 bytes of data. These bytes map to the screen left to right and top to bottom. Byte values are 0-255 (0x00-0xFF hex). See here for more information on downloading bitmaps.
Display Screen from Flash ESC E n
Recall stored image from flash memory and show it on the screen. ESC E (uppercase E; 69 dec, 0x45 hex) n where n is 0-16 (the screen page). The value n is sent as a byte set to 64 + screen number.
Example: To display the screen stored in page 3 of flash memory you would send the sequence 27 69 67 decimal (0x1B 0x45 0x44 hex).
Set Font Size and Source Page ESC F n
Recall stored screen from flash memory. ESC F (uppercase F; 70 dec, 0x46 hex) n where n is 64 + font size (0-3) + source page (0-28 in steps of 4).
| Font Size n | Font Size (pixels) | Screen Layout (lines x characters) |
|---|---|---|
| 0 | 6x8 | 4x20 |
| 1 | 12x8 | 4x10 |
| 2 | 6x16 | 2x20 |
| 3 | 12x16 | 2x10 |
All positioning is is terms of the font size in effect at the time, so valid locations are 0-79 when the 4x20 font is in use, and 0-19 with the 2x10 font.
The bitmaps that the SGX uses to draw individual characters are stored as a pair of full-screen images. Each character occupies a 6x8-pixel block. An SGX font can have up to 160 characters corresponding to ASCII codes 32 to 191 decimal (0x20 to 0xBF hex). The default font is in screen pages 0 and 1, but using Escape F you can instruct the SGX to use other stored bitmaps as the font source. These alternative fonts don't have to be letters and numbers— you can use them as 6x8-pixel graphical icons (or larger graphics by tiling multiple characters). Here are the font-source values:
| Font Source n | Screen Pages |
|---|---|
| 0 | 0,1 |
| 4 | 2,3 |
| 8 | 4,5 |
| 12 | 6,7 |
| 16 | 8,9 |
| 20 | 10,11 |
| 24 | 12,13 |
| 28 | 14,15 |
To change the font size and font source, add the values together. For example, to use tall (6x16-pixel characters) from stored bitmaps at pages 4 and 5, you would use the value 2 + 8 + 64 (where 2 sets the size, 8 sets the font pages, and 64 is the magic number that's added to most escape-code arguments).
Set the Pixel Color (Ink) for Points and Lines ESC I n
Set the pixels for points and lines to n — dark (1) or light (0). ESC I (uppercase I; 73 dec, 0x49 hex) n. Add 64 to n.
Example: To set the ink to light (0) you would send the sequence 27 73 64 decimal (0x1B 0x49 0x40 hex). Note that light pixels are not visible unless they print on a dark background.
Draw a Line ESC L x1 y1 x2 y2
Draw a line from x1 y1 to x2 y2 in the current ink and mode. ESC L (uppercase L; 76 dec, 0x4C hex) x1 y1 x2 y2, where x coordinates range from 0-119 and y coordinates 0-31, and 64 must be added to all coordinates. The xy origin (0,0 point) is at the upper left corner of the screen, but it can be moved to the lower left by an Escape W configuration setting.
Example: To draw a line from the lower-left to upper-right of the screen you would send the sequence 27 76 64 95 183 64 decimal (0x1B 0x4C 0x40 0x5F 0xB7 0x40 hex).
Set the Logic Mode (OR, XOR) for Points and Lines ESC M n
Set the mode for points and lines to n — OR (0) or XOR (1). ESC M (uppercase M; 77 dec, 0x4D hex) n. Add 64 to n. In OR mode, dark pixels always print dark; in XOR mode, dark pixels print dark on a light background and light on a dark background. Light pixels always print light regardless of this setting.
Example: To set the mode to XOR (1) you would send the sequence 27 77 64 decimal (0x1B 0x4D 0x40 hex).
Plot a Point ESC P x y
Plot a point at x y (in the current combination of ink and mode). ESC P (uppercase P; 80 dec, 0x50 hex) x y where x is 0-119 and y is 0-31, and 64 must be added to both coordinates.
Example: To plot a point in the middle of the screen (60,16) you would send 27 80 124 80 decimal (0x1B 0x50 0x7C 0x50 hex).
Reverse (Highlight) Line(s) ESC R n
Reverse an 8-pixel high line to create a highlight-bar effect. ESC R (uppercase R; 82 dec, 0x52 hex) n where n specifies the lines to be highlighted. Add 64 to n.
| Value of n | Line to Highlight |
|---|---|
| 0 | none |
| 1 | 0 |
| 2 | 1 |
| 4 | 2 |
| 8 | 3 |
You can highlight multiple lines by adding together the values of n from the table; for example, to highlight the top and bottom lines n=1+8 (+64, as usual). To eliminate all highlights, use n=0 (+64).
Example: To highlight lines 0 and 3 you would send 27 82 73 decimal (0x1B 0x52 0x49 hex).
Draw Line From Current Point To New Position ESC T x y
Draw a line from the end of the last line drawn to the specified x y position. ESC T (uppercase T; 84 dec, 0x54 hex) x y where x is 0-119 and y is 0-31 (add 64 to x and y). Line-to is a handy shortcut for drawing simple connect-the-dots graphics (e.g., boxes) or graphs.
Example: To draw a line from the end of the last line drawn to coordinates 100, 20 you would send 27 84 164 84 decimal (0x1B 0x54 0xA4 0x54 hex).
Set Vertical Origin ESC V n
Set the vertical origin to the top or bottom of the screen. ESC V (uppercase V; 86 dec, 0x56 hex) n, where n is 0 (+64 for top of screen) or 1 (+64 for bottom).
Example: To set the vertical origin to the bottom of the screen you would send 27 86 65 decimal (0x1B 0x56 0x41 hex).
Write Startup Configuration ESC W n
Write configuration settings that automatically take effect when the display is powered up. ESC W (uppercase W; 87 dec, 0x57 hex) n where n specifies the startup options from the table. Add 64 to n. See here for a Windows software tool that automates the configuration process.
| Value of n | Startup Option |
|---|---|
| 1 | Backlight on |
| 2 | Show page 2 bitmap |
| 4 | Write-protect screen pages |
| 8 | Font=wide |
| 16 | Font=tall |
| 32 | Vertical origin=bottom |
| 128 | *Permit Font Overwrite |
You can combine settings by adding values of n from the table; for example, to have the display start with the backlight on and the large (tall and wide) font in effect n=1+8+16 (+64, as usual). To turn off all startup options, use n=0 (+64). Note that ESC W works only when the Dsu (Display setup) jumper is uncut. When the display is set up the way that you want it for long-term operation, cut the jumper to prevent accidental configuration changes.
Example: To configure the display to start up with the backlight on, write protected, and the vertical origin at the bottom of the screen you would send 27 87 101 decimal (0x1B 0x57 0x65 hex).
Options written by ESC W replace previous settings, they do not add to them. For instance, if the SGX is currently set to start up with the backlight on and you want it to also show the page 2 bitmap, you must send an ESC-W instruction with both options (27 87 67 dec, 0x1B 0x57 0x43 hex).
*NOTE: . "Permit Font Overwrite" is a new option in version 2.0. When screen page write protection is in effect, the SGX will not allow replacement of screen pages 0 and 1 (the default font). To overwrite the font pages, you must first configure the SGX with write-protection off and font-overwrite permission on.
Store Screen to Flash ESC X n
Store the current screen to the specified page of flash memory. ESC X (uppercase X; 88 dec, 0x58 hex) n where n is the screen page 0-16 (+64). Once a screen is stored, it can be recalled to the screen using ESC E. Note that screen pages 0 and 1 are the display's default font--if you store a non-font bitmap to these locations text will print as blocks of that bitmap, not as recognizable letters an numbers. For this reason, the display ships with pages 0 and 1 write-protected. You can undo this safeguard (to alter the font) using ESC W above.
Example: To save the current screen contents to flash page 6 you would send 27 88 70 decimal (0x1B 0x58 0x46 hex).
See here for more information on downloading bitmaps using a Windows software utility.
Nudge Display Contrast ESC +, ESC -, ESC =
Set the screen contrast slightly darker (+), lighter (-), or to the factory default (=). ESC followed by the plus symbol (+, 43 dec, 0x2B hex), minus symbol (-, 45 dec, 0x2D hex) or equals symbol (=, 61 dec, 0x3D hex).
In version 2.0, only one step of contrast nudge is supported; sending multiple + or - instructions has no effect. V2.1 and later support multiple steps of contrast nudge; depending on factory calibration as many as 32 steps up or down are possible.
Contrast changes are not permanent; the display resets to default contrast when the power is cycled. However, in v2.1 and later the current contrast setting is stored as the new default during an ESC W config-save.
Example: To make the screen lighter than the default you would send 27 45 decimal (0x1B 0x2D hex).